Monday, December 29, 2008

Duality

This series of images originates from my recent photo shoot with Alan, however in each case I have created double exposures. For these images I chose two images that were very similar -- perhaps only the hand position was different along with some small movement of the camera as I shot the next frame. One image was copied over the other as a new layer in Photoshop. Then I chose "Color Burn" as the blending mode for the second layer.

I like the resulting images in each case because the blending mode created an eerie feeling, especially in the shots where Alan is looking directly into the camera.


Thursday, December 25, 2008

Dreamboy


Today's image continues the posts of Alan from my recent shoot. This image has been processed in Photoshop to look like a solarized image. To create the effect I used the Photoshop Curves dialog and elevated the dark end of the spectrum while leaving the rest of the spectrum alone.
A gallery of Alan with solarized images has been added to my website today. The gallery is called "dreamboy".

Thursday, December 18, 2008

Magician


This is another image from my recent shoot with Alan. Although it wasn't what I was thinking of when we arranged the shot, now his hand and finger positions put me in mind of a magician.

Monday, December 15, 2008

Armed


This week's image is from a shoot yesterday with Alan. Alan has a great physique -- although slightly smaller than some of the other models I have worked with in the past. One of Alan's many strong points is the detail in his upper arm, captured in this close-up with strong side lighting.
The image was shoot digitally, converted to grey scale, then toned.

Sunday, November 30, 2008

Burden


This morning I have been experimenting with negatives from older shoots - playing with cropping, tones and other effects on scanned negatives. This image of Jason is the best result from the work.

Sunday, November 02, 2008

Yvan Again


One final post from the series of shots taken several years ago of Yvan.

David


Another black and white image of David from last weekend's shoot.

Sunday, October 26, 2008

Last Chance


I've said before that the last image of the shoot is usually the best one. Why is that? Sometimes it takes most of the shoot to establish a good rapport between the photographer and the model. Sometimes it is because both the model and the photographer have exhausted all their preconceived ideas for the shoot and are finally ready to listen to their muse.
The weeks image is from a shoot today with David and is a case in point -- the last image of the shoot and the best.

Saturday, October 18, 2008

Leather Jacket


For this image I placed the dominate light to the reat and to the side, accentuating the feeling that Yvan is comtemplative, in isolation from the rest of the world.
Additionally I had him play with the leather jacket until it became more like binding than a jacket.

Sunday, October 12, 2008

Something Different


I shot this image of professional bodybuilder Kevin Levrone about ten years ago at the Mr. Olympia in Los Angeles. The photograph was taken from my seat in the audience with at telephoto lens, without flash and with a high speed film -- most likely 1600 ASA. The grain is a result of the high speed film.
For several years in the ninties I took my camera to bodybuilding events and shot several rolls of high speed film from my seat. With a 300mm lens on a 35mm camera it was fairly easy to get good shots of the pros. I got the best results when I had orchestra seats.
At this Olympia event I was seated in the balcony. Hence the photo is cropped to zero in on Kevin and there is more grain than usual.
Tickets for the Iron Man Invitational held every year in Los Angeles during February were less expensive and it was easy to get seats just a few rows back.
If you try this, the key is to use a 1600 ASA film and turn off your flash. Your flash won't do any good anyway because it only reaches about ten feet. It just makes you look stupid to real photographers.

Thursday, October 09, 2008

Praise


Sometimes when I work with a model in the studio and want to loosen him up and discourage him from falling into standard bodybuilding poses, I ask him to swing his arms and throw his head back.
This instruction, like all others I give a model, gets different results each time I try it.
In this image Yvan looks like he could be offering a prayer to the heavens.

Saturday, October 04, 2008

Yvan


This image of Yvan was created several years ago. I have worked with Yvan twice over the years. In this first photo shoot with him he was larger and more defined.
Several years later when I worked with Yvan again he had purposely lost size to compete with fashion models in the modeling industry. Although is is still handsome and magic in front of a camera, I personally prefer his look in this shoot.
This image was shot on film in black and white with a Mamiya medium format camera in a rented studio with hot lights. At this point in my career I was just beginning studio work and had not yet bought my own equipment and set up my own space.
Oddly the lighting arrangements in this early shoot are very much like the ones I use today. I am using two equally bright lights at about 90 degrees from the camera on either side of the model.

Sunday, September 14, 2008

Jock Strap

This image is from one of my first photo shoots at a nude figure workshop. The model's name is Tony. The location is a stretch of desert east of San Diego. This was shot with color film, grey scaled and then toned.

Monday, September 01, 2008

Alan Effects

These two images are both based on the same photography of Alan. The first is a reversal or negative of the image.
The second image is a digital variant of the Lith technique whereby you use a negative to create a positive image on Lithographic film; then use you Lith positive to create a Lith negative; then print a positive from the final Lith negative. Taking the image through these steps with Lith film eliminates the gray tones and turns everything to either flat black or flat white. The Photoshop digital equivalent of this technique is much simpler and less time consuming. Basically you adjust the image using the Curves dialoge box and force the dark half fo the image to black and the light half to white. I used to spend literally days doing this technique the old way. The only down side is that the Photoshop technique is so easy that what used to feel like an art technique not feels like a simple digital trick. If it's not difficult, can it be art?

Sunday, August 24, 2008

Statuesque


This image of Kyle was inspired by a baroque statue. The image was shot digitally, and given a slight warm tone.

Sunday, August 03, 2008

Alan

This week's image was shoot digitally, converted to black and white and given a warm tone.

The model is one of my all time favorites, Alan Demond, whose spectacular build and modeling talent made for an incredibly creative and productive photo shoot.

Saturday, July 26, 2008

Mist


More of Kyle. This one shot digitally, adjusted in Photoshop and transformed using the Orton effect.

Sunday, July 20, 2008

Saturday, July 12, 2008

Kyle Kontinued - Film


This is a scan from one of the film images of my recent shoot with Kyle.

Friday, July 04, 2008

Kyle Kontinued


This image is from last weekend's shoot with Kyle. It was shot digitally.

Sunday, June 29, 2008

Kyle


The massive man in this week's post is Kyle from the Pacific Northwest. Kyle is a competitive bodybuilder I shot this weekend. He has great overall size and proportion.
This black and white image was shot digitally.

Sunday, June 22, 2008

Near the Door


This week a black and white photo of Derrick by the door.

Next week I hope to have more recent work after a Sunday photo shoot with a new model I have never worked with before.

Saturday, June 14, 2008

Archer


This image of Josh from a shoot several months ago started with instructing him to pose like an archer, then relaxing the hand postion a little until it started to resemble the painting of Adam or God reaching for one another on the Sistine Chapel ceiling.
Shot on film with a black paper backdrop, scanned and toned in Photoshop CS3.

Saturday, June 07, 2008

Wednesday, June 04, 2008

Accentuate the Negative


I've been experimenting with some new techniques. This one is fairly basic. It's just an inverted, or negative version of an image. Since I do a lot of shots against a black background, the images are well shooted to this because the backgrounds drop out just as much with then are white as they do when they are black.

Sunday, June 01, 2008

Joshing Around


From a shoot a couple years ago, this is Josh, shot digitally. At this particular point in my transition to digital, I was only using my digital camera to proof the lighting levels and light arrangement in my studio. This is similar to an age old technique followed by studio photographers working with medium format or large format cameras in which they do a light check with a polaroid film back on their studio camera before shooting regular film transparencies or negatives. The polaroid image allows them to see immediately what the film will capture.

Since I was only doing a light check, I only took a half dozen photos at the start of the session with my digital camera. The rest were all taken with film.
I still use my digital camera to do light checks, but more often than not I use the digital camera to take more than half the images during the shoot.

When I am doing light checks like this one, I don't pose the model. I am not trying to create usable images. I am just verifying the light arrangement. Consequently the compositions and the model poses are straight forward and simple, like this one.

As we progress through the shoot and the model and I develop confidence in one another, I start to provide more challenging direction. Sometimes I have the model imagine they are something else -- an animal or a fantasy creature. Sometimes I show the model a picture of classical sculpture and have them use that as the starting point for their positioning, then proceed with variations either based on the exact position or the feeling of the art.

More and more I shoot the first dozen or so shots with a digital camera because as the model and I are warming up, we aren't "wasting" any film. As we start to get humming I switch back and forth frequently between digital and film. Sometimes when I take a shot on film that I really like, I'll switch cameras and take the same shot with my digital camera so I have a copy of the image that I can start working with that same night while the film is at the lab.


Saturday, May 24, 2008

Toned

Today's image is from a shoot with Alan, shot digitally, transformed into a black and white and then toned in Photoshop with warm highlights and neutral darks.

Friday, May 23, 2008

Double Vision

The double exposure is an old photographic effect, usually created by exposing two different images on the same negative. In prior postings on this blog I have shown a different type of double exposure created by developing one photograph from two negatives sandwiched together in the enlarger.

In my progression from film to digital imagery I have been experimenting with different ways to create similar effects without the use of film. The three images in this week's blog are the result of this experiment.


In each case I have taken two digital images of the same model. I opened both in Photoshop, then copied and pasted one over the other as a second layer. Then in the layer dialog box I chose the blending mode "Difference" and an opacity level near 100%.
As I began this experiment I tried each of the different blending modes and played with different opacity levels for each, trying to duplicate the effect one gets with film. None of them duplicated the effect, but the method I used to create these images creates an interesting alternative to the film approach.
In particular I like the way this effect works on models with great muscle definition, like the two images of Dwain. It creates a hard edge that accentuates the muscle definition.
In the final image of the three, the overlap of the two images creates a kind of halo effect around the interior image.
Expect to see a new gallery on my website in the near future filled with other images like these as I continue experimenting.

Monday, May 12, 2008

Mark - IR


Since Kodak discontinued their infrared film I have been experimenting with alternative films. This one from Freestyle is pretty much a total wash when it comes to IR effects, but I still like the image.
For anyone experimenting with Freestyle's IR film, the problem with it is that the negatives come back very "thin" after developing (i.e. light like they were underexposed) and there is zero IR glow from the skin of the model.

Back Study


This week I offer a study in back musculature. The model is Bruce. The photograph was taken several years ago.
As can be seen, Bruce was in fantastic shape when this was shot, with very low body fat and thin skin.
The composition of the photograph might be a little unusual in that the model is facing away from the camera, but as Bruce pulls and pushes on the railing with his arms, the muscles of his back come into amazing relief.
The image was shot on black and white film, scanned from film and then toned with a slightly warm cast in Photoshop.

Sunday, May 04, 2008

Chris


This week an image from my older work of a model named Chris. The photo shoot was done at a friend's house with a spectacular spa and pool. This image was shot with color slide film and scanned.

Sunday, April 27, 2008

Mark - B&W

About half of my work is film, and while I don't expect black and white film to completely disappear from the market during my lifetime, lately I have been experimenting more with creating the type of black and white images I love with my digital equipment.


Creating a pleasing black and white print is not as simple as setting your digital camera on gray scale or desaturating your jpg images in Photoshop.


Both of those techniques usually yield images that are flat and unappealing.


When creating black and white images with your digital camera, it's best to think of the image captured by your camera as just a starting point, like film negatives.


It's also best to save the images in RAW format, not jpg, to give yourself the maximum latittude in adjusting the image overall, but that's another discussion.


My image this week was shot digitally and color corrected in Photoshop's RAW program.


Afterwards, I opened the photo in Photoshop and used the black and white dialoge box. I chose the built-in High Contrast Red filter. Then I further adjusted the image with Curves to create some additional contrast.


The original color image is shown below. The preference for color or black and white images is emotional. I prefer black and white in most cases.


Sunday, April 20, 2008

Saturday, April 19, 2008

Coupling


Over the last two weeks I have replaced two galleries on my website. This image is from the gallery I added last Sunday, called "coupling".
If you frequent this blog, you have seen other photographs of these models.
This particular photograph was shot with Ilford black and white infrared film, scanned into Photoshop from the negative, then taken through the Orton effect steps I have experimented with on other images in this blog.
All the images in the new gallery were processed the same way.

Sunday, April 13, 2008

HDR Photography


This weekend I have been experimenting with HDR photography. If you are interested in looking at other HDR images, there are dozens of sites that feature them. This one http://www.smashingmagazine.com/2008/03/10/35-fantastic-hdr-pictures/ provides some excellent examples. It also provides links to other sites that explain what HDR images are and how to create HDR images using Photoshop.


In layman's terms an HDR image is a merger of two or more separate photographs of the same subject, usually taken with a tripod. They work best when photographing objects that do not move, such as buildings. The separate images are shot with different exposures. For example you might shoot one lighter than normal, one normal and one darker than normal. Merging three such images together allows one to create an image with detail in the shadows and highlights as well as the mid range.


By way of illustration, if you have ever taken a picture of a room inside a house on a sunny day, you realize that you can either expose for the daylight scene outside the window, in which case the room is dark, or you can expose for the room, in which case the scene outside the window is almost completely white. This is because film and digital sensors have a limited range of perception. The human eye can perceive both the inside and the outside, but the equipment we use cannot.


Photoshop will merge two, three, four, or more images of different exposures to produce one image that shows detail in the highlights as well as the shadows.


In the case of the image in my blog today, I cheated a little. I shot the image in camera raw. Then I created three copies of the raw image and took advantage of capabilities of raw files to alter the exposures after the fact, so that one was light, one was dark and one was normal. Then I merged the three raw images into one HDR image. You might think you could do the same thing with jpg images, but you can't really. Raw files are basically all the data captured by the camera with a sidecar data that tells your computer what exposure settings you used. Your computer applies those settings at the moment you open the file. So, with some limitations, it is as though you hadn't actually made the decision of where to set your f/stop until you open the file on the computer. Most digital SLRs allow you to shoot raw files. Most point and shoots do not.


I haven't read of anyone doing this before, although it seems like an obvious after the fact short cut. In all likelihood shooting three separate images from the get go produces superior results since the camera is more likely to capture additional detail, but people don't stand perfectly still, so cheating this way allows me to use this technique on photographs of my models when this might not be otherwise possible.
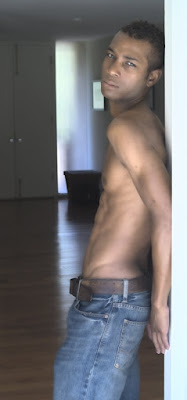
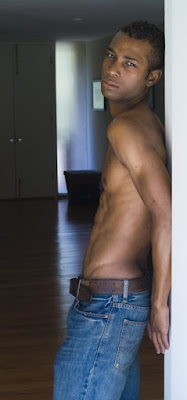
I don't usually show before/after images of my work, but in this case I am posting the original image below so you can see the HDR effect. It's sutble, but there is a smoother gradiation of tone on the model's skin in the HDR photo at the top, and a little more detail in the shadows. The unretouched HDR image from Photoshop showed much more detail in the shadows near the door in the background, but I opted to darken the shadows a little more with curves after the fact.


Saturday, April 12, 2008

One From the Vault


I am not very pleased with most of the images I created long ago when I look back on my early physique work, but this image is an exception.
There are things I might do differently, but what I like about this photograph is the model's position and the lighting.
Also today, on my website -- link to the right on this page -- I have posted a new gallery of photographs of Eric from my recent photoshoot. Some of the photos have been published here, but most have not.

Sunday, April 06, 2008

Mark


This image is from a photo shoot two weeks ago with a local model I found through an ad on Craigslist. The image was shot digitally and transformed into a black and white in photo shop.
I love the smooth texture of Mark's body in the this image.

Left


This is an image from several years ago, scanned today and reinterpreted.
Originally I printed this in bright reds and blues. This time I desaturated it, darkened it somewhat and flattened the tonal range.
The result is something close to a black and white image.
I have always liked this image -- with model's back turned to the photographer, walking from the set, and cropped so that his head is not visible -- maybe because it strays from the usual, or maybe because it reveals the reality beyond the edge of backdrop.

Sunday, March 30, 2008

Eric in Air


This is another in the series of photos from the recent shoot with Eric.

Thursday, March 27, 2008

Eric in IR

This image is from the infra red film shot during the recent photo shoot with Eric.

Friday, March 21, 2008

Eric


One of the black and white film shots from last week's shoot with Eric. This one started from a statue as well -- one of Hercules bursting free of his chains -- but as Eric interpreted it, it took on a new form and a new feeling.

Saturday, March 15, 2008

Centaur


This is a digital image from a shoot today with Eric. This pose was a riff off statue -- not exactly like the position of the statue, but the same general idea.
As we shot a series of these with the same leg position it occured to me that the trailing leg reminded me of a centaur. As we worked with variations on this position we started to call it the centaur pose.

Monday, March 10, 2008

Processed Cheese

What is the dividing line between art and craft? At what point does a tool or technique interfere with artistic vision instead of enhancing it?

Ordinarily I avoid using the canned Photoshop filters to alter my images out of a sense that the result is cheesy, but nonetheless I found myself experimenting with a few of them on the work from my recent couples shoot.

The images in this week's blog use the "accented edges" filter.

I like the result, or I wouldn't be posting the pictures, but is it photographic art or is it just artistic design? I'm not sure.

The total effect can't be fully appreciated without looking at the enlarged images, so I recommend that you click on the images to see the image in the size I created it.

The filter creates a kind of painterly effect on photographs, as though someone had created them with black and white paint, narrowing the tonality creating the suggestion of three dimensional form by juxtaposing slightly lighter and darker sections of flat color on canvas.

But if one wanted that effect, maybe one should have done it with oil and canvas instead of creating a faux paint effect in Photoshop from a perfectly fine photograph.


Popular Posts